


CTE Curriculum
Prepare learners with CTE curriculum aligned to industry standards.


Administrators’ Guide
This process should be completed by the Schoology Administrator.
LTI 1.1 Integration Guide
- Log in to Schoology with an Administrator account
- Click Tools
- Select School Management
- Click Integration, then External Tools
- Click Add External Tool Provider
Tool Settings
- Tool Name: iCEV
- Consumer Key: please contact us for this information
- Shared Secret: please contact us for this information
- Privacy: Send Name and Email/Username of user who launches the tool
- Configuration Type: Manual
- Match By: Domain
- Domain/URL: login.icevonline.com
When finished, click Submit.
LTI 1.3 Integration Guide
Before you begin, make sure the Develop Apps permission is enabled for the System Administrator role: app.schoology.com/users/manage/permissions

Step 1 - Create the iCEV Developer App
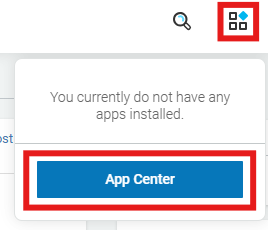
- Click the App Grid (four-square icon) in the top navigation bar
- Navigate to App Center → My Developer Apps → Add App
- Complete the app configuration using the following settings:
App Name: iCEV
Description: iCEV LTI 1.3
Category: Select all
Available for: Only people in my school — check “Make app available to System Administrators only,” leave “This app uses cookies” unchecked
Starting price: Leave blank
Type of App: LTI 1.3 App — leave “Launch app in Schoology” unchecked
Can be installed for: Select Courses — Left Navigation, Course Materials Selection, Rich Text Editor, External Tools
Configuration Type: Manual
Privacy: Send Name and Email/Username of user who launches the tool
LTI Advantage Extensions: Deep Linking; check Assignment and Grade Services (and its sub-option, Use Unique Line Item Identifiers for Linked Sections); check Names and Roles Service
JWKS URL: https://login.icevonline.com/lti/.well-known/jwks.json
Domain/URL: https://login.icevonline.com/lti
Custom Parameters: check “Include App Custom Parameters with External Tool Link launches”
OIDC Login Init URL: https://login.icevonline.com/lti
Redirect URLs: https://login.icevonline.com/lti; check “Require System Administrator to configure settings for this App” and “This application meets the Schoology Terms of Use” - Click Submit
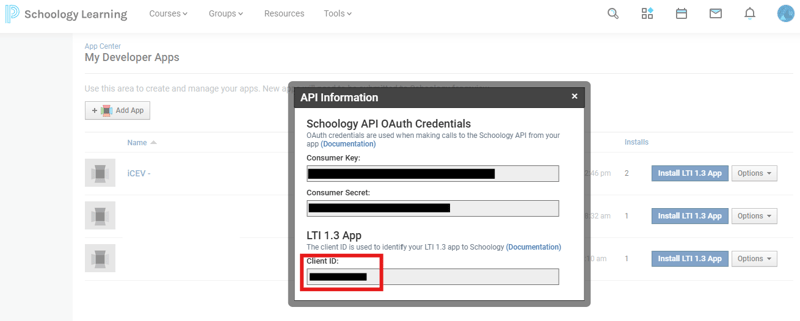
Step 2 - Send the Client ID to iCEV (Required)
After creating the app:
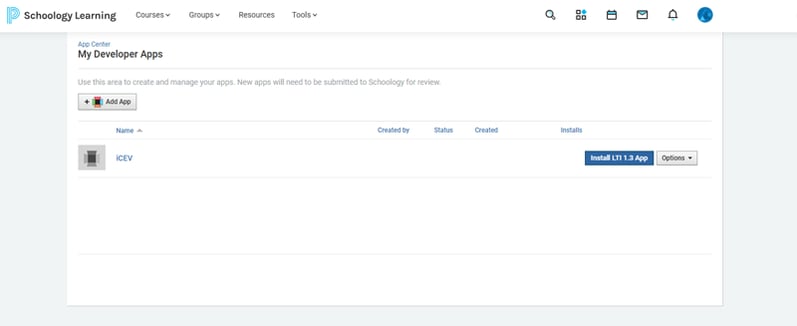
- Go to App Center → My Developer Apps
- Locate the iCEV app you just created
- Select Options → API Info
- Copy the Client ID
- Email the Client ID to integrationsupport@icevonline.com
Step 3 - Install the LTI 1.3 App
Install for the Organization
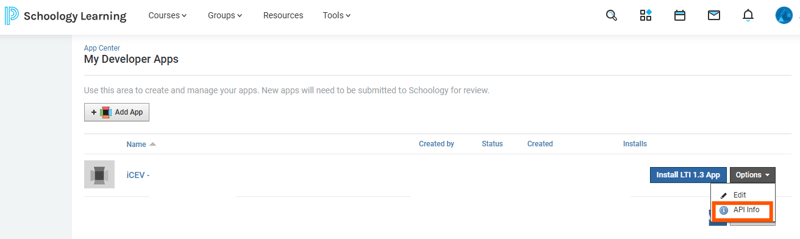
- Go to App Center → My Developer Apps
- Click Install LTI 1.3 App
- Click I Agree
- Click Continue
- Click Add to Organization
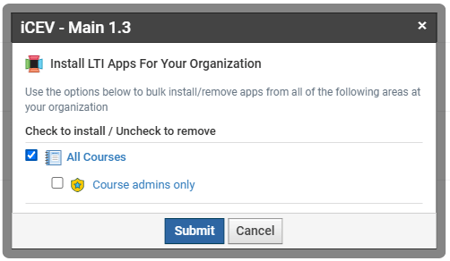
Install for Courses
Once the app has been added to the organization:
- Go to App Center → Organization Apps
- Find the iCEV app and click Install/Remove
- Select All Courses
- Click Submit
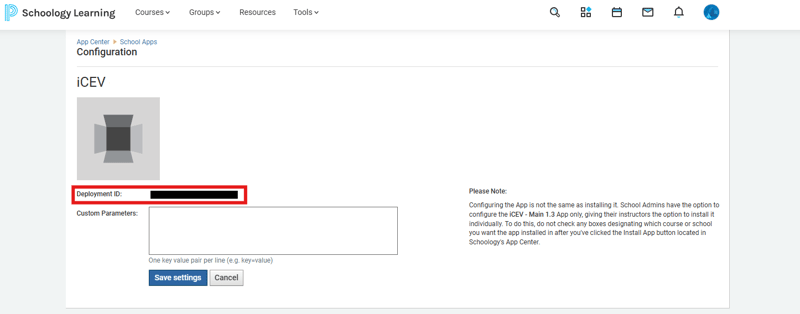
Step 4 - Send the Deployment ID to iCEV (Recommended)
To locate the Deployment ID:
- Go to App Center → Organization Apps
- Find the iCEV app and click Configure
- Copy the displayed Deployment ID
- Email the Deployment ID to integrationsupport@icevonline.com

Grade Passback Requirements
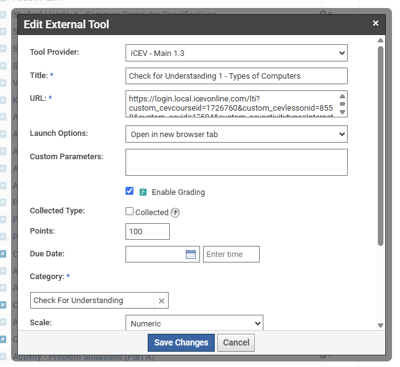
For grades to sync correctly between Schoology and iCEV:
- Grading must be enabled for the assignment
- A valid grading category must be selected — ungraded assignments will not pass grades back
- The iCEV LTI 1.3 Tool Provider must be selected for each assignment that should sync grades
Failure to meet any of these requirements may prevent grade passback from functioning properly.
Submitting Integration Details to iCEV
After setup is complete, send both of the following to integrationsupport@icevonline.com:
- Client ID (Required)
- Deployment ID (Recommended)
Your integration will not be considered complete until the required information has been submitted to iCEV and a confirmation email has been received.
The iCEV Integration Support team will complete the remaining configuration and notify you once the integration is ready for use.
Teachers' Guide
NOTE: After the external tool has been setup by the Schoology Administrator, please follow these steps. These steps assume that the Schoology Administrator has setup the external tool (integration) in Schoology. If they have not, please send the Administrators Section to the Schoology Administrator.
Step 1 - Export Lesson from iCEV
NOTE: It's recommended to only export one lesson at a time.
- Navigate to Your Course
Go to the Courses page in iCEV and locate the lesson you want to export. Click the blue View button next to that lesson.
- Review Lesson Materials
Inside the lesson, review all materials. Make sure everything you want to include in the export is marked Visible to Students, including:
• Presentations• Instructional materials• Interactive assignments - Click "Export Common Cartridge"
Click the green Export Common Cartridge button in the upper-right corner of the lesson page.
- Select Your LMS
A pop-up window will appear. From the dropdown menu, select the Learning Management System used by your school district.
- Start the Export
Click the green Export button to begin the process.
- Download the IMSCC File
An IMSCC file (Common Cartridge format) will be created and downloaded to your computer.
⚠️ Do not open this file—it's designed to be imported directly into your LMS.
Step 2 - Importing an iCEV Common Cartridge into Schoology
- Open Resources
• Navigate to your Schoology course• Click the Resources tab - Start the Import Process
• Click the dropdown arrow next to the "My Resources" section• Select Import
- Set Up the Import Collection
• Choose Common Cartridge (.IMSCC)•Select New Collection or Existing Collection•Choose the option that best fits how your Schoology resources are organized
- Name the Collection
•If creating a new collection, enter a collection name•It is recommended to use the same name as the lesson or content exported from iCEV•Click Next
- Upload the Common Cartridge File
• Click Attach File• Locate and select the Common Cartridge file exported from iCEV• Click Next
- Complete the Import
• Wait while Schoology processes the file• Open the collection you selected during import• Verify that all content marked Visible to Students in iCEV appears in the collection
Step 3 - Adding Imported iCEV Curriculum to a Schoology Course
- Open Resources
• Navigate to the Resources tab in Schoology• Locate the imported iCEV curriculum collection
- Open Collection Options
• Find the curriculum folder or collection• Click the gear icon on the right side
- Add Content to a Course
• Select Add to Course• Choose the course where you'd like to place the curriculum
- Select a Folder Location
• Choose a destination folder within the course, if desired• This step is optional but can help organize course materials
- Add the Curriculum
• Click Add• Wait for Schoology to copy the content into the selected course
- Verify the Content
• Open the Schoology course• Locate the newly added curriculum folder• Confirm that all lessons and resources have been copied successfully
Step 4 - Enabling Grading for iCEV Assignments in Schoology
- Open the Assignment
• Navigate to the Schoology course• Select the iCEV assignment you want to grade
- Edit the Assignment
• Click the gear icon• Select Edit
- Enable Grading
• Check the Enable Grading option• This allows the assignment to appear in the Schoology gradebook
- Set a Point Value
• Enter the number of points the assignment is worth• Adjust the point value to fit your grading policy
- Assign a Category
• Select a grading category such as:• Homework• Classwork• Quiz• Other district-defined categories
- Save the Changes
• Verify that a grading category has been selected• Save the assignment settings
- Confirm the Assignment is Graded
• Return to the course materials• Verify the assignment is configured as a graded item and will report scores to the Schoology gradebook
NOTE: This process must be repeated for each assignment where grade pass-back is expected.
Features
NOTE: The user interface shown in these videos may look different from the current iCEV platform. While the visual design has been updated, the steps and functionality demonstrated remain the same.
Lesson Visibility Settings
Assignment Visibility Settings
Student Feedback Options
Attempt Threshold Options
Sending iCEV Custom Assessments into Schoology