At the top right of the My Courses page, click Add New Course/Certification.
Step 2: Select Certification
Click the iCEV Testing Platform Certifications tab.
Select the certification you want to add. After selection, “Select Playlist” changes to “Selected”.
Tip: Subscribed to more than one iCEV curriculum site? Use the Course Subject dropdown (under the blue header) to choose the subject area.
Step 3: Name the Certification
Type the title in the Course Title box.
This is how the certification will appear on your My Courses page.
Note: You do not have to type the full certification title. If you prefer, you can use a shortened version of the certification title or you can title it something like, "3rd Period."
Step 4: Add Course
After entering your preferred title, scroll to the top and click Add Course. The certification appears under Courses Added. Then click Save and Exit.
Note: To add multiple certifications at once, repeat Steps 2–3 before clicking Save and Exit.
Diagnostic Pretests
What is Diagnostic Pretesting?
Teachers may enable a pretest before students access the certification curriculum. The pretest assesses current knowledge and enables growth reporting for students and classes. Growth values never go below zero.
Important: Once enabled, pretesting cannot be turned off. If enabled by mistake, create a new certification playlist course and do not enable pretesting.
New students
If a new student joins a course with pretesting enabled, they must complete the pretest before accessing the curriculum.
Enabling Pretests
Under Settings (right side of the screen):
Click Enable Pretests.
Wait for the popup window.
Check Yes, enable pretests for this certification course.
Click Enable.
You’ll see: “Pretests have been successfully enabled.”
Canceling the process
Click in the shaded area of the dialog, or
Press Esc, or
Click the red X.
After enabling, the status and date that the pretest was enabled will appear under Settings.
Industry Certification Reports
With pretesting enabled, additional information is available in the Industry Certification Reports dashboard:
Pretest scoring information
Certification scoring information (if completed)
Growth (difference between Certification and Pretest scores)
Lowest possible value is 0
Using iCEV Study Materials
iCEV curriculum can be used comprehensively or as supplemental preparation materials for certification exam success.
Step 1: View Certification
Click the View button next to the certification playlist you want to customize.
Step 2: Select Lessons
You’ll be redirected to the Lessons page.
Each lesson has a Required for Cert? checkbox.
Checked lessons require an assessment before the certification exam.
All lessons are selected by default unless you uncheck them.
Note: Unchecking a lesson removes the pre‑exam requirement, but the topic will still appear on the certification exam.
Step 3: Review Certification Strategies for Success
This lesson provides tips and advice for preparing and studying for the certification exam.
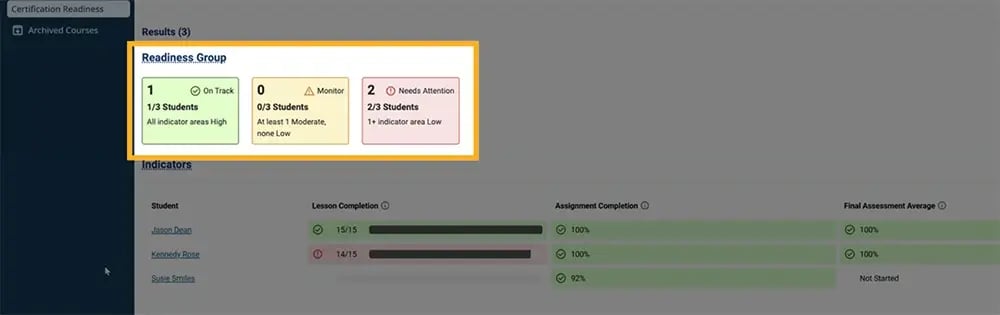
New Feature - Certification Readiness Indicator
iCEV’s Certification Readiness feature gives educators instant visibility into how students are progressing toward certification success.
Accessing Certification Readiness Through the Reports Menu
Open Reports from the main navigation menu, select Certification Readiness from the options that, choose your course, then click View Report to access your class data.
In a certification aligned course page, select the Certification Readiness link below the Readiness Group summary. This opens the same readiness report for the class connected to that course.
To find out more about this new feature, access the Certification Readiness tutorials linked on the iCEV Platform.
Proctoring a Certification Exam
Step 1: Select Certification
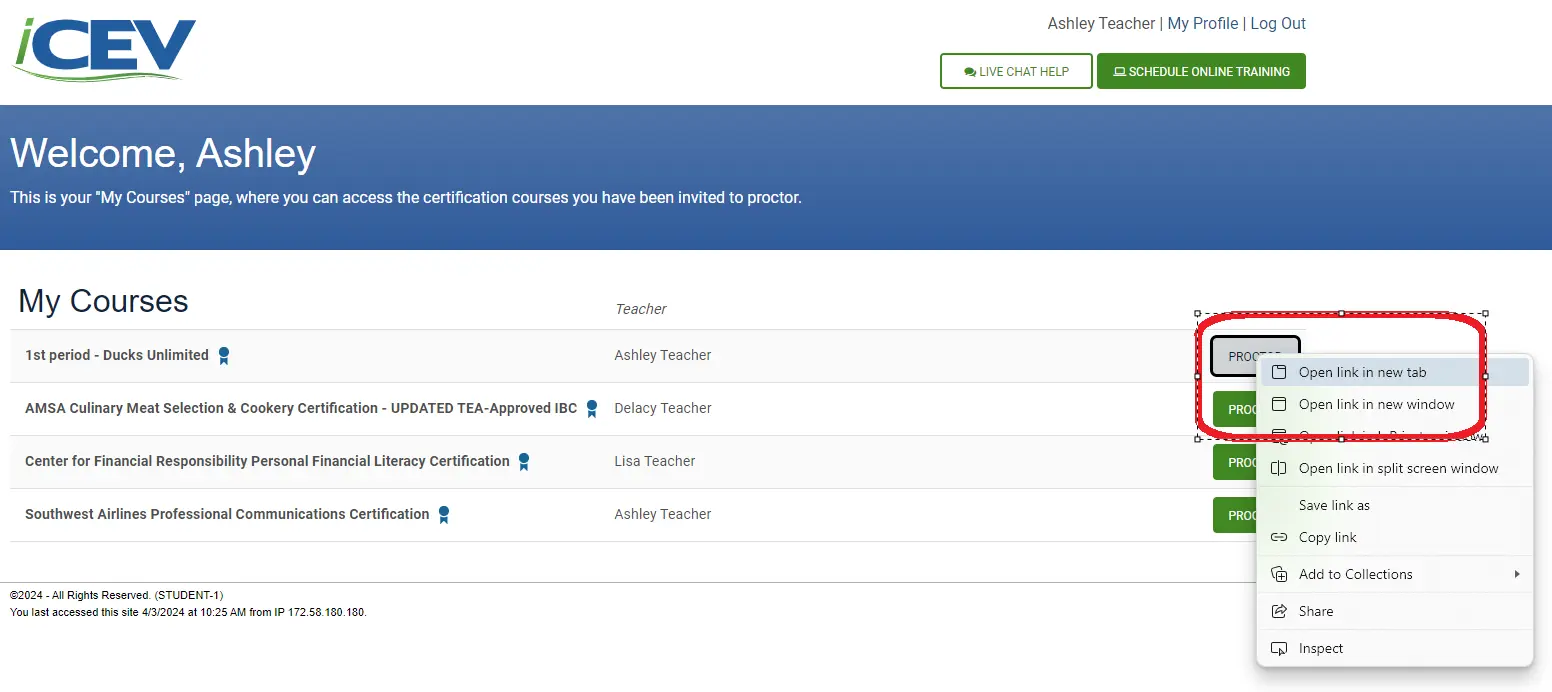
From the My Courses page, both the proctor and the student should click View next to the certification.
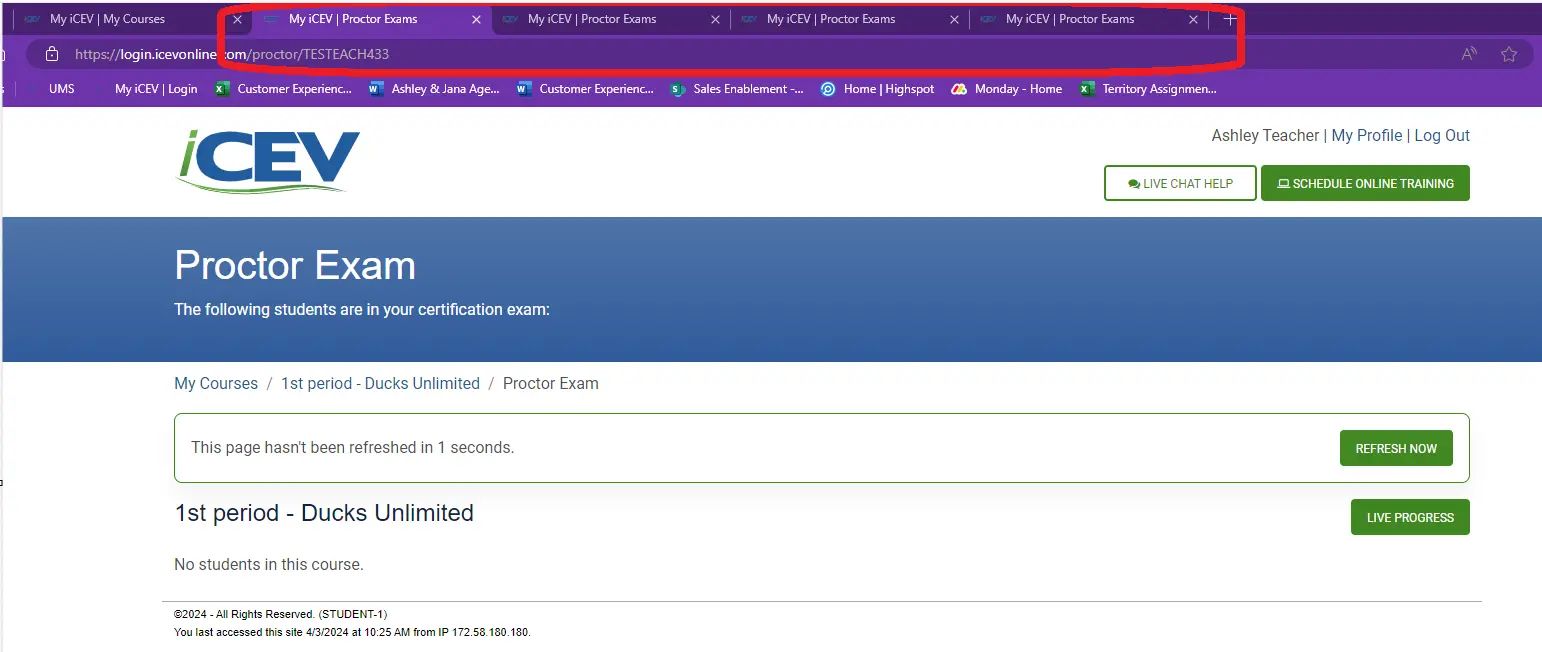
Proctoring for more than one certification exam: The proctor page supports one exam per page for performance. To oversee multiple certifications, open each exam in its own browser tab/window (right‑click the proctor button → “Open link in new tab”).
Open each exam in a separate tab to proctor multiple exams efficiently.
Step 2: Manage Proctors
Teacher View – Proctor the Exam
Scroll to the bottom of the Lessons page.
Under Proctors:
Click Manage Proctors to assign a proctor if you will not be proctoring the exam and need to assign a proctor, or
Click Proctor Exam to proctor yourself.
Student View – Confirm Identity
Once a student is ready to take a certification exam they should:
Locate the Final Assessment at the bottom of the Lessons page.
Confirm their identity by checking the box and clicking the green Check In button.
The exam status will read: “Waiting on Proctor to start the exam.”
If a student is ready but hasn’t checked in, you’ll see “Not Checked‑in” message. Ask the student to check in; once the student has checked in, the status will change to “Ready”.
The floating timer shows when you last refreshed the proctor page. If a candidate says they’ve checked in but you don’t see them, click “Refresh Now”.
Status – Ready
“Ready” means the student completed required lessons and has checked in.
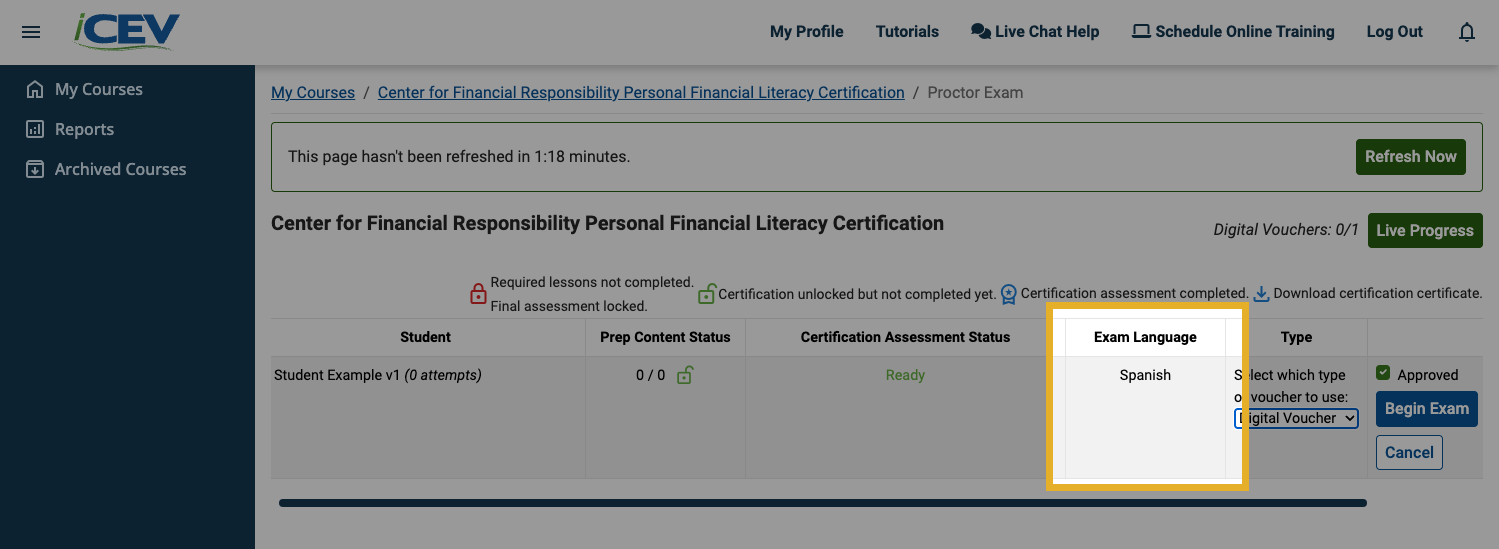
New Feature Column – Exam Language
With the new Spanish language option for select certification exams, the proctor page now includes an Exam Language column that shows the language of each student’s exam.
Exam Language column on the proctor page.
Status – Select which type of voucher to use
Digital Voucher
A digital version of the manual voucher codes. When selected, the student will be sent directly into the exam.
Select Digital Voucher (selected by default).
Click the Approved checkbox.
Click Begin Exam.
Voucher Code
This is a manual code that must be entered. In the past teachers would have to give out the code and have the student enter it or the teacher would go to the student and enter it for them. Now the code can be entered from the Proctor Exams screen.
Enter a manual voucher code directly from the Proctor Exams screen:
Select Voucher Code from the dropdown.
Enter the voucher code in the textbox.
Click the Approved checkbox.
Click Begin Exam.
Student Entry
Sends the student to a manual voucher/credit card payment screen. After submission, they proceed to the exam.
Troubleshooting
If a student was set to use a manual voucher, but when they tried to start the final certification exam, they were taken to a "Select Method of Payment" screen. This happened because either:
The voucher code was invalid, or
The voucher code was previously used.
Step 4: Monitoring Progress
Note: Students must begin their certification exam within 20 minutes of proctor approval. If they fail to do so, their session will be terminated, and they will receive the following notification.
Timeout message shown if the candidate doesn’t start in time.
When this occurs, the candidate is placed in a “reset” state and will not need another digital voucher or payment. Each candidate is granted three resets.
Understanding the Live Progress Screen Icons
The Live Progress screen includes visual indicators to help proctors monitor student activity in real time.
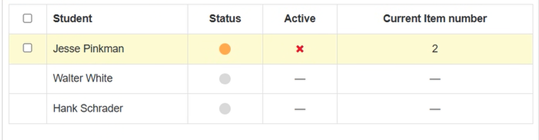
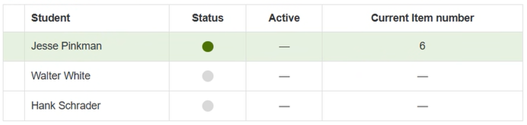
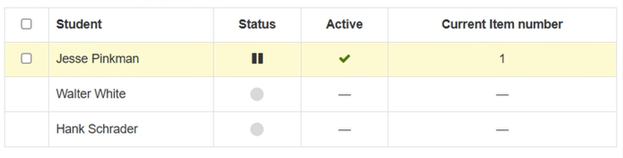
Active Column
✓Green Check Mark – Student is actively working in the iCEV exam window.
Green check mark = active focus in the exam window.
✕Red X – Student clicked outside the iCEV exam window and may be accessing something else.
Red X = student left the exam window.
— Dash – Exam has been submitted.
Dash = exam submitted.
Status Column
⏸ Pause Icon – Question review pop‑up is open.
Orange Dot – Exam is currently active.
Green Dot – Exam has been submitted.
Step 5: Resetting
Important: The reset button appears only after a candidate checks back in following a technical issue that disrupted testing.
How the reset works
Proctors can reset a student’s attempt up to three times per student per certification. Resets prevent consuming a digital voucher/code when:
Testing device loses power or network connectivity
Student closes the browser/tab or navigates to a different website
Notes:
Students must start within 20 minutes of approval; otherwise, a timeout message appears.
Timeout message when the 20‑minute window is missed.
Students with ≥ 70 correct answers at disruption will pass and won’t restart. Students with > 30 incorrect answers at disruption will not have a reset option.
Exam Features
Students can flag questions to revisit.
Students can review all questions before submitting the exam, which will help prevent accidentally skipped questions.
Viewing Student Certification Reports
Step 1: Go to Reports
From any page on the iCEV Platform, use the left-hand navigation to click Reports.
Select Student Certifications from the expanded options.
Step 2: View Reports
You’ll see a report for each certification attempted by your students, including:
Certified – total students who earned the certification
Attempts – total exam attempts
Passing – pass rate percentage
AVG Time – average time on the exam
AVG Grade – average exam grade
Industry Standard Reports – class average of correct answers for each industry standard.
Note: Reports with an eye icon in the top right corner can be clicked on to view individualized student reports. This is where teachers can download spreadsheet versions of the reports.
Step 3: View Certification Summary Report
Click the Certification Summary Report icon.
A new tab opens to the Student Certification Summary page.
Select a Certification Report from the dropdown, then click View Report.
A report is generated for each student.
Step 4: View Assessment Attempts
If lessons were required to be completed before attempting the exam, click the ratio (#/ #) next to a student’s name to view progress and assessment scores (opens in a new tab).
To view the students’ progress for a different certification, select a different certification from the Certification drop-down menu.
Student Certification Reporting
Choose which students appear in the Student Certification Report.
Show Current Students
Shows students currently in the iCEV roster (default).
Show Previous Students
Shows students not currently in the iCEV roster (applies to certification courses reused without deletion).
Show All Students
Shows both current and previous students.
Student Certification Reporting – Industry Standards Report
See how students scored compared to the class average and to each other.
Click Industry Standard Reports.
Open the Report Type dropdown and select Student.
Report Types
Student – Individual performance by standard alongside class average.
Class – Overall class performance (original report format).
Score Modes
Percentage (default) – Shows the overall percentage performance of the student in the different certification standard areas.
Points (select to view) – Shows the overall points performance of the student in the different certification standard areas.
We're Here to Help
If you have any questions or need additional support, please contact us using one of the options below: